TensorFlow
This was adapted from Princeton University Multi-GPU Training with PyTorch
The starting point for multi-GPU training with Keras is tf.distribute.MirroredStrategy. In this approach, the model is copied to N GPUs and gradients are synced as we saw previously. Be sure to use tf.data to handle data loading as is done in the example on this page and is explained graphically here.
Single-Node, Synchronous, Multi-GPU Training
Here were train the ResNet-50 model on the Cassava dataset (see video on TensorFlow YouTube channel). Here is another example video using the "cats vs. dog" dataset.
Step 1: Create a TensorFlow Overlay File
# create a working directory
[NetID@log-1 ~]$ mkdir /scratch/<NetID>/tensorflow-example
[NetID@log-1 ~]$ cd /scratch/<NetID>/tensorflow-example

# copy over an overlay file with sufficient resources and unzip it
[NetID@cm001 tensorflow-example]$ cp -rp /scratch/work/public/overlay-fs-ext3/overlay-15GB-500K.ext3.gz .
[NetID@cm001 tensorflow-example]$ gunzip overlay-15GB-500K.ext3.gz

# start the singularity environment
[NetID@cm001 tensorflow-example]$ singularity exec --overlay overlay-15GB-500K.ext3:rw /scratch/work/public/singularity/cuda12.1.1-cudnn8.9.0-devel-ubuntu22.04.2.sif /bin/bash

# install miniforge in singularity environment
Singularity> wget --no-check-certificate https://github.com/conda-forge/miniforge/releases/latest/download/Miniforge3-Linux-x86_64.sh
Singularity> bash Miniforge3-Linux-x86_64.sh -b -p /ext3/miniforge3

# create an miniconda environment file
Singularity> touch /ext3/env.sh
Singularity> nano /ext3/env.sh
# and add the following content to it:
#!/bin/bash

unset -f which

source /ext3/miniforge3/etc/profile.d/conda.sh
export PATH=/ext3/miniforge3/bin:$PATH
export PYTHONPATH=/ext3/miniforge3/bin:$PATH
# activate the new environment and initialize
Singularity> source /ext3/env.sh
Singularity> conda config --remove channels defaults
Singularity> conda clean --all --yes
Singularity> conda update -n base conda -y
Singularity> conda install pip -y
Singularity> conda install ipykernel -y

# check that you're using the miniconda environment
# you should get the following output
Singularity> which conda
/ext3/miniforge3/bin/conda
Singularity> which python
/ext3/miniforge3/bin/python
Singularity> which pip
/ext3/miniforge3/bin/pip

# install TensorFlow
Singularity> pip install tensorflow[and-cuda] tensorflow_datasets
Step 2: Download the Data
This example using the cassava dataset which requires 4 GB of storage space. Be sure to save this in your /scratch space and not in /home.
Please save the following into a file named download_data_and_weights.py:
import tensorflow as tf
import tensorflow_datasets as tfds

# download the data (4 GB) on the login node
_ = tfds.load(name='cassava', with_info=True, as_supervised=True, data_dir='.')

# download the model weights on the login node
_ = tf.keras.applications.ResNet50(weights="imagenet", include_top=False)
Run the command below to download the data (4 GB in size):
# switch to a data transfer node
[NetID@log-1 tensorflow_example]$ ssh gdtn
[NetID@dtn-1 ~]$ cd /scratch/NetID/tensorflow_example
[NetID@dtn-1 tensorflow_example]$ singularity exec --nv --overlay /scratch/NetID/pytorch-example/my_pytorch.ext3:ro /scratch/work/public/singularity/cuda12.1.1-cudnn8.9.0-devel-ubuntu22.04.2.sif /bin/bash -c "source /ext3/env.sh; python download_data_and_weights.py"
Step 3: Inspect the Script
Below is the contents of mnist_classify.py:
import argparse
import os
import tensorflow_datasets as tfds
import tensorflow as tf
from time import perf_counter

def preprocess_data(image, label):
  image = tf.image.resize(image, (300, 300))
  image = tf.cast(image, tf.float32) / 255.0
  return image, label

def create_dataset(batch_size_per_replica, datasets, strategy):
  batch_size = batch_size_per_replica * strategy.num_replicas_in_sync
  return datasets['train'].map(preprocess_data, num_parallel_calls=tf.data.AUTOTUNE) \
                          .cache() \
                          .shuffle(1000) \
                          .batch(batch_size) \
                          .prefetch(tf.data.AUTOTUNE)

def create_model(num_classes):
  base_model = tf.keras.applications.ResNet50(weights="imagenet", include_top=False)
  x = base_model.output
  x = tf.keras.layers.GlobalAveragePooling2D()(x)
  x = tf.keras.layers.Dense(1016, activation="relu")(x)
  predictions = tf.keras.layers.Dense(num_classes, activation="softmax")(x)
  model = tf.keras.Model(inputs=base_model.input, outputs=predictions)
  return model

def train(epochs, num_classes, train_dataset, strategy):
  with strategy.scope():
    model = create_model(num_classes)
    model.compile(loss='sparse_categorical_crossentropy',
                  optimizer=tf.keras.optimizers.Adam(learning_rate=0.0001),
                  metrics=['accuracy'])

  start_time = perf_counter()
  model.fit(train_dataset, epochs=epochs)
  print("Training time:", perf_counter() - start_time)
  return None

def print_info(num_replicas_in_sync, batch_size_per_replica, info, num_classes):
  print(f'TF Version: {tf.__version__}')
  print(f'Number of GPUs: {num_replicas_in_sync}')
  print(f'Batch size per GPU: {batch_size_per_replica}')
  print(f'Train records: {info.splits["train"].num_examples}')
  print(f'Test records:  {info.splits["test"].num_examples}')
  print(f'Number of classes: {num_classes}')
  return None

if __name__ == '__main__':
  parser = argparse.ArgumentParser(description='Multi-GPU Training Example')
  parser.add_argument('--batch-size-per-replica', type=int, default=32, metavar='N',
                      help='input batch size per GPU for training (default: 32)')
  parser.add_argument('--epochs', type=int, default=15, metavar='N',
                      help='number of epochs to train (default: 15)')
  args = parser.parse_args()

  datasets, info = tfds.load(name='cassava', with_info=True, as_supervised=True, data_dir=".")
  num_classes = info.features["label"].num_classes

  strategy = tf.distribute.MirroredStrategy()
  train_dataset = create_dataset(args.batch_size_per_replica, datasets, strategy)
  train(args.epochs, num_classes, train_dataset, strategy)

  print_info(strategy.num_replicas_in_sync, args.batch_size_per_replica, info, num_classes)
Step 4: Submit the Job
Below is a sample Slurm script:
#!/bin/bash
#SBATCH --job-name=cassava       # create a short name for your job
#SBATCH --nodes=1                # node count
#SBATCH --ntasks=1               # total number of tasks across all nodes
#SBATCH --cpus-per-task=16       # cpu-cores per task (>1 if multi-threaded tasks)
#SBATCH --mem=64G                # total memory per node (4G per cpu-core is default)
#SBATCH --gres=gpu:2             # number of gpus per node
#SBATCH --time=00:20:00          # total run time limit (HH:MM:SS)

module purge

srun singularity exec --nv \
	    --overlay /scratch/NetID/pytorch_examples_new/tensorflow-example/tensorflow.ext3:ro \
	    /scratch/work/public/singularity/cuda12.1.1-cudnn8.9.0-devel-ubuntu22.04.2.sif\
	    /bin/bash -c "source /ext3/env.sh; python mnist_classify.py --batch-size-per-replica=32 --epochs=15"
Be sure to change NetID in the above script to your NetID.
Submit the job as follows:
[NetID@log-1 tensorflow_example]$ sbatch job.slurm
Performance
The training time is shown below for different choices of cpus-per-task and the number of GPUs on a test system (your results will vary depending on your system specs):
| nodes | ntasks | cpus-per-task | GPUs | Training Time (s) | Mean GPU Utilization (%) |
|---|---|---|---|---|---|
| 1 | 1 | 2 | 1 | 574 | 85 |
| 1 | 1 | 4 | 1 | 565 | 83 |
| 1 | 1 | 8 | 1 | 562 | 89 |
| 1 | 1 | 16 | 1 | 564 | 90 |
| 1 | 1 | 4 | 2 | 339 | 76 |
| 1 | 1 | 8 | 2 | 334 | 81 |
| 1 | 1 | 16 | 2 | 332 | 74 |
| 1 | 1 | 4 | 3 | 256 | 68 |
| 1 | 1 | 8 | 3 | 251 | 73 |
| 1 | 1 | 16 | 3 | 249 | 66 |
| 1 | 1 | 4 | 4 | 226 | 59 |
| 1 | 1 | 8 | 4 | 220 | 58 |
| 1 | 1 | 16 | 4 | 214 | 65 |
| 1 | 1 | 32 | 4 | 218 | 63 |
"Training Time" in the table above is the time to run model.fit(train_dataset, epochs=epochs). "Mean GPU utilization" was taken from the output of the jobstats command.
The figure below shows the speed-up as a function of the number of GPUs. The dashed line shows the maximum possible speed-up.
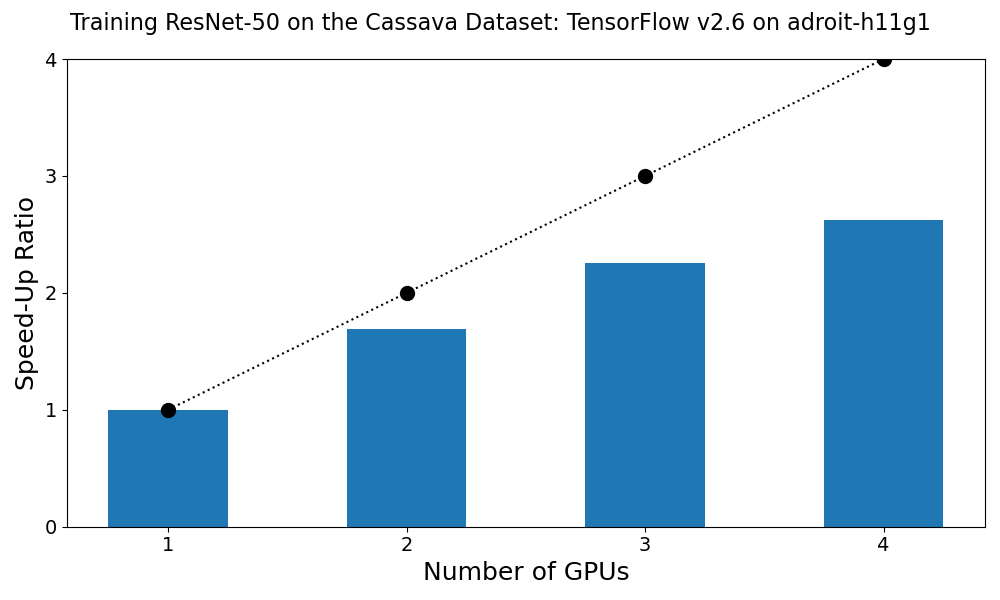
We see that linear scaling is not observed. That is, the training time when using 2 GPUs is not 1/2 of the training time when using one. To improve on this one would profile the script and identify the performance bottleneck. Some of the training images are 500 pixels wide. It could be that the preprocessing step is the slowest.
Multi-node Training
- MultiWorkerMirroredStrategy for using the GPUs on more than one compute node.
- Keras API.
- Horovod is a distributed deep learning training framework for TensorFlow, Keras, PyTorch, and Apache MXNet. It is based on MPI.