Jupyter Notebook with Conda/Singularity in OOD
Please note that Greene and Torch organize overlay files and Singularity images in different directories.
Greene Directories
Overlay Files:
/scratch/work/public/overlay-fs-ext3/
Singularity Files:
/scratch/work/public/singularity/
Torch Directories
Overlay Files:
/share/apps/overlay-fs-ext3
Singularity Files:
/share/apps/images/
OOD + Singularity + conda
This page describes how to use your Singularity with conda environment in OOD GUI at Torch.
Log Into Torch via the Terminal
The following commands must be run from the terminal. Information on accessing via the terminal can be found at Connecting to the HPC or you can log into OOD and select the Clusters tab at the top of the page and select Torch Shell Access.
Preinstallation Warning
If you have initialized Conda in your base environment, your prompt on Torch may show something like:
(base) [NetID@log-1 ~]$
then you must first comment out or remove this portion of your ~/.bashrc file:
# >>> conda initialize >>>
# !! Contents within this block are managed by 'conda init' !!
__conda_setup="$('/share/apps/anaconda3/2020.07/bin/conda' 'shell.bash' 'hook' 2> /dev/null)"
if [ $? -eq 0 ]; then
    eval "$__conda_setup"
else
    if [ -f "/share/apps/anaconda3/2020.07/etc/profile.d/conda.sh" ]; then
        . "/share/apps/anaconda3/2020.07/etc/profile.d/conda.sh"
    else
        export PATH="/share/apps/anaconda3/2020.07/bin:$PATH"
    fi
fi
unset __conda_setup
# <<< conda initialize <<<
The above code automatically makes your environment look for the default shared installation of Conda on the cluster and will sabotage any attempts to install packages to a Singularity environment. Once removed or commented out, log out and back into the cluster for a fresh environment.
Prepare Overlay File
First, start a job to work on the compute nodes.
[NetID@log-1 my_env]$ sbatch --cpus-per-task=2 --mem=10GB --time=04:00:00 --wrap "sleep infinity"

# wait to be assigned a node then SSH to the node
Once you SSH to the node, you can begin setting up the environment.
[NetID@log-1 ~]$ mkdir /scratch/$USER/my_env
[NetID@log-1 ~]$ cd /scratch/$USER/my_env
[NetID@log-1 my_env]$ cp -rp /share/apps/overlay-fs-ext3/overlay-15GB-500K.ext3.gz .
[NetID@log-1 my_env]$ gunzip overlay-15GB-500K.ext3.gz
Above we used the overlay file overlay-15GB-500K.ext3.gz which will contain all of the installed packages. There are more optional overlay files. You can find instructions on the following pages: Singularity with Conda, Squash File System and Singularity.
Launch Singularity Environment for Installation
[NetID@log-1 ~]$ singularity exec --fakeroot --overlay /scratch/$USER/my_env/overlay-15GB-500K.ext3:rw /share/apps/images/cuda12.3.2-cudnn9.0.0-ubuntu-22.04.4.sif /bin/bash
Above we used the Singularity OS image cuda12.3.2-cudnn9.0.0-ubuntu-22.04.4.sif which provides the base operating system environment for the conda environment. There are other Singularity OS images available at /share/apps/images
Launching Singularity with the --overlay flag mounts the overlay file to a new directory: /ext3 - you will notice that when not using Singularity /ext3 is not available.
Be sure that you have the Singularity prompt (Singularity>) and that /ext3 is available before the next step.
Singularity> ls -lah /ext3
total 8.5K
drwxrwxr-x.  2 root root 4.0K Oct 19 10:01 .
drwx------. 29 root root 8.0K Oct 19 10:01 ..
Install Miniforge to Overlay File
Singularity> wget --no-check-certificate https://github.com/conda-forge/miniforge/releases/latest/download/Miniforge3-Linux-x86_64.sh
Singularity> sh Miniforge3-Linux-x86_64.sh -b -p /ext3/miniforge3
Next, create a wrapper script at /ext3/env.sh:
Singularity> touch /ext3/env.sh
Singularity> echo '#!/bin/bash' >> /ext3/env.sh
Singularity> echo 'unset -f which' >> /ext3/env.sh
Singularity> echo 'source /ext3/miniforge3/etc/profile.d/conda.sh' >> /ext3/env.sh
Singularity> echo 'export PATH=/ext3/miniforge3/bin:$PATH'         >> /ext3/env.sh
Singularity> echo 'export PYTHONPATH=/ext3/miniforge3/bin:$PATH'   >> /ext3/env.sh
Your /ext3/env.sh file should now contain the following:
#!/bin/bash
unset -f which
source /ext3/miniforge3/etc/profile.d/conda.sh
export PATH=/ext3/miniforge3/bin:$PATH
export PYTHONPATH=/ext3/miniforge3/bin:$PATH
The wrapper script will activate your conda environment, to which you will be installing your packages and dependencies.
Next, activate your conda environment with the following:
Singularity> source /ext3/env.sh
Install Packages to Miniforge Environment
Now that your environment is activated, you can update and install packages:
Singularity> conda config --remove channels defaults
Singularity> conda update -n base conda -y
Singularity> conda clean --all --yes
Singularity> conda install pip --yes
Singularity> conda install ipykernel --yes # Note: ipykernel is required to run as a kernel in the Open OnDemand Jupyter Notebooks
To confirm that your environment is appropriately referencing your Miniforge installation, try out the following:
Singularity> unset which
Singularity> which conda
# output: /ext3/miniforge3/bin/conda

Singularity> which python
# output: /ext3/miniforge3/bin/python

Singularity> python --version
# output: Python 3.12.9

Singularity> which pip
# output: /ext3/miniforge3/bin/pip
Now use either conda or pip to install your required python packages to the Miniforge environment.
To install larger packages, like Tensorflow, you must first start an interactive job with adequate compute and memory resources to install packages. The login nodes restrict memory to 2GB per user, which may cause some large packages to crash.
Singularity> exit

[NetID@log-1 my_env]$ sbatch --cpus-per-task=2 --mem=10GB --time=04:00:00 --wrap "sleep infinity"

# wait to be assigned a node then SSH to the node

[NetID@cm001 my_env]$ singularity exec --fakeroot --overlay /scratch/$USER/my_env/overlay-15GB-500K.ext3:rw /share/apps/images/cuda12.3.2-cudnn9.0.0-ubuntu-22.04.4.sif /bin/bash

Singularity> source /ext3/env.sh
# activate the environment
After it is running, you’ll be redirected to a compute node. From there, run singularity to setup on conda environment, same as you were doing on login node.
Configure iPython Kernels
To create a kernel named my_env copy the template files to your home directory.
Please note that kernel_template on Greene is stored under /share/apps/mypy/src/kernel_template
Singularity> mkdir -p ~/.local/share/jupyter/kernels
Singularity> cd ~/.local/share/jupyter/kernels
Singularity> cp -R /share/apps/kernel_template ./my_env # this should be the name of your Singularity env

Singularity> cd ./my_env

Singularity> ls
#kernel.json  logo-32x32.png  logo-64x64.png  python # files in the ~/.local/share/jupyter/kernels directory
To set the conda environment, edit the file named python in /.local/share/jupyter/kernels/my_env/.
The python file is a wrapper script that the Jupyter notebook will use to launch your Singularity container and attach it to the notebook.
At the bottom of the file we have the template singularity command.
singularity exec $nv \
  --overlay /scratch/$USER/my_env/overlay-15GB-500K.ext3:ro \
  /share/apps/images/cuda12.3.2-cudnn9.0.0-ubuntu-22.04.4.sif \
  /bin/bash -c "source /ext3/env.sh; $cmd $args"
If you used a different overlay (/scratch/$USER/my_env/overlay-15GB-500K.ext3 shown above) or .sif file (/share/apps/images/cuda12.3.2-cudnn9.0.0-ubuntu-22.04.4.sif shown above), you MUST change those lines in the command above to the files you used.
Edit the default kernel.json file by setting PYTHON_LOCATION and KERNEL_DISPLAY_NAME using a text editor like nano/vim.
{
 "argv": [
  "PYTHON_LOCATION",
  "-m",
  "ipykernel_launcher",
  "-f",
  "{connection_file}"
 ],
 "display_name": "KERNEL_DISPLAY_NAME",
 "language": "python"
}
to
{
 "argv": [
  "/home/<Your NetID>/.local/share/jupyter/kernels/my_env/python",
  "-m",
  "ipykernel_launcher",
  "-f",
  "{connection_file}"
 ],
 "display_name": "my_env",
 "language": "python"
}
Update the "<Your NetID>" to your own NetID without the "<>" symbols.
Launch an OOD Jupyter Notebook
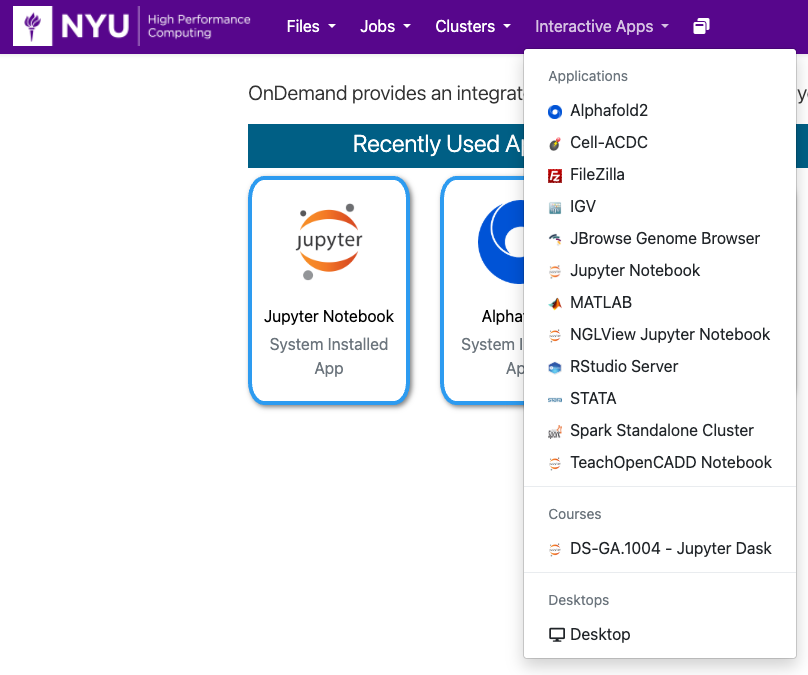
Go to https://ood.torch.hpc.nyu.edu
and select Jupyter Notebook from the Interactive Apps pull-down menu:
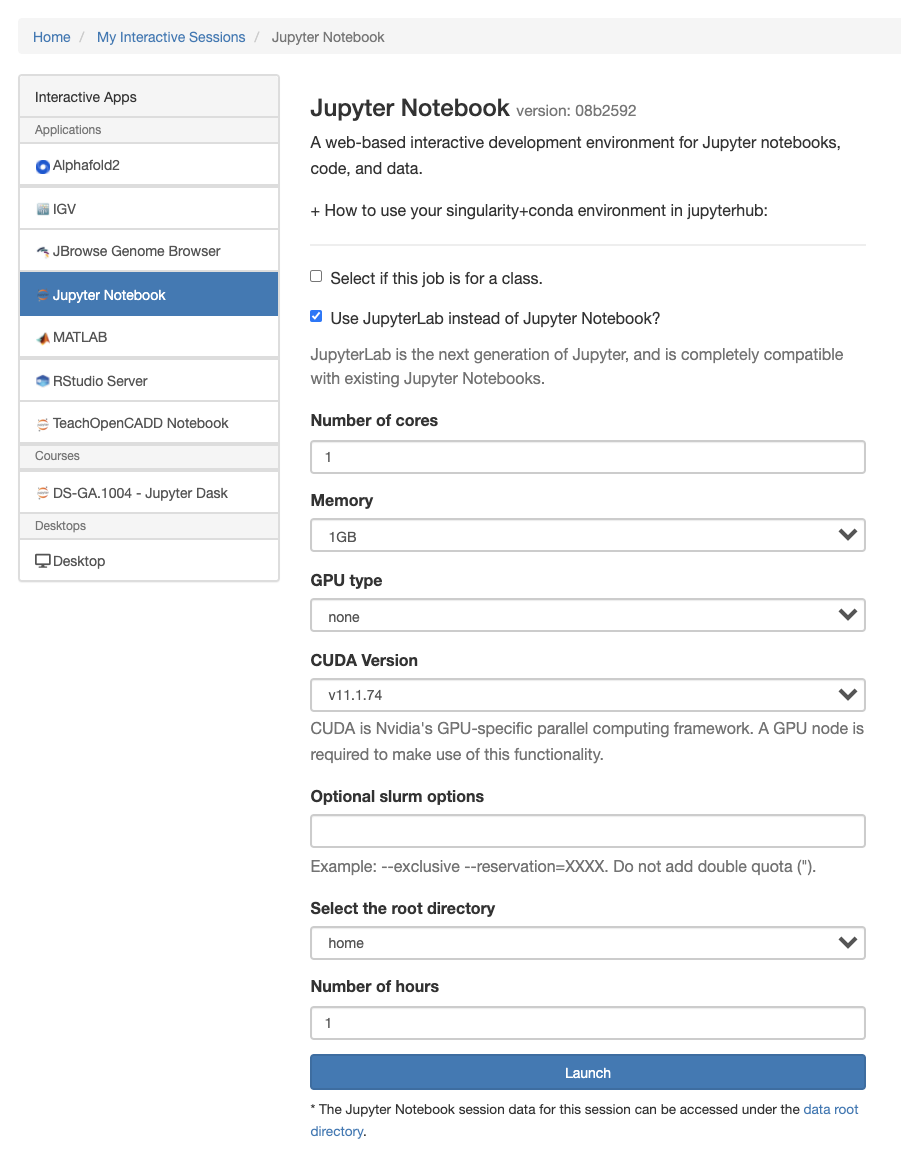
Configure and Launch your Notebook
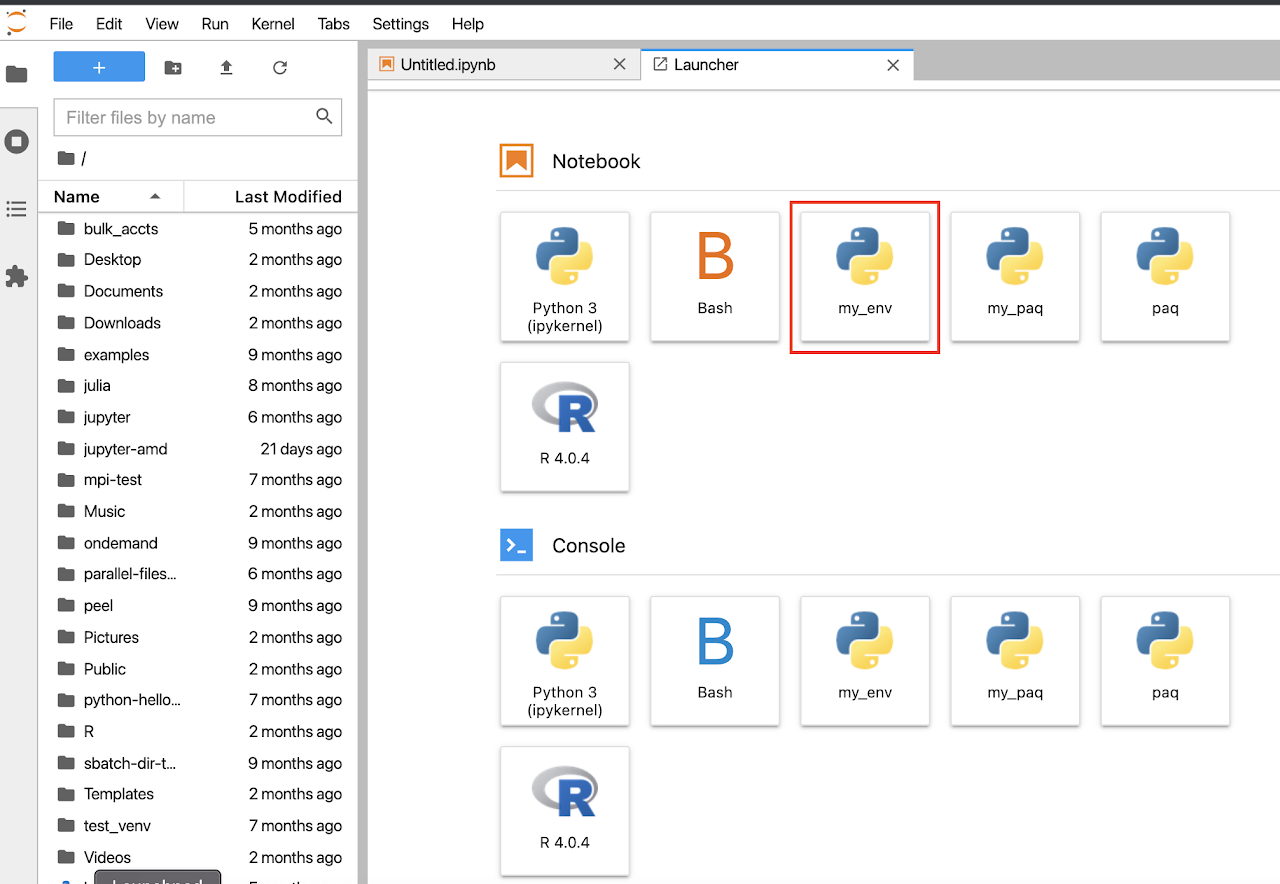
Select kernel
Once configured and launched, kernels can be selected in the "New" dropdown or within the notebook under the kernel menu. Please note that your notebook view may look slightly different depending on available directories and environments, as well as if you choose the lab or traditional notebook view.